
Hotline Order:

Email ID:
sales@scartek.co.ke
-
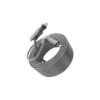
Starlink Gen 3 Cable (V3)
The Starlink Gen 3 Cable, often called the V3 cable, is the official Power over Ethernet (PoE) cable that connects the Starlink Dish V4 (Gen 3 flat rectangular dish) to the Gen 3 Router. Introduced in late 2023, it’s a major upgrade from previous generations due to its use of standard RJ45 connectors, allowing easy replacements and extensions with off-the-shelf Cat6 Ethernet cables. As of September 2025, it’s standard in all new Starlink kits and highly regarded for its durability in residential, RV, and mobile setups. This cable carries both data and power (up to 57V DC) from the router to the dish, enabling high-speed satellite internet without additional adapters.
Key Features
- Length: Standard kit includes a 75 ft (23 m) cable; extensions available up to 150 ft (45 m) from the Starlink Shop. Third-party options range from 33 ft (10 m) to 131 ft (40 m).
- Connectors: RJ45 (standard Ethernet) on both ends—rectangular without the locking tab on the dish side for a secure, weatherproof fit. Gold-plated contacts in official and premium third-party versions for better conductivity and oxidation resistance.
- Specifications: Cat6-rated for data speeds up to 1-2 Gbps (1200-2000 Mbps) and stable power delivery without voltage drop over distance. 24AWG single-core copper with metal shielding and PVC jacket for EMI protection.
- Design and Durability: Flat, flexible design (max diameter 19.05 mm / ¾ inch) for easy routing through walls or conduits; folds flat to minimize hole size. Waterproof and weatherproof (IP67-equivalent for outdoor use), operable in -22°F to 122°F (-30°C to 50°C). Not rated for burial or submersion.
- Compatibility: Exclusive to Starlink Dish V4 (Gen 3) and Gen 3 Router. Not compatible with Gen 2 rectangular dish, Standard Actuated, Mini, or older circular dishes without adapters. Works with third-party Cat6 cables for extensions, but Starlink recommends Cat5e or higher.
Setup Guide
- Attach one RJ45 end to the dish’s PoE port (remove the protective cover).
- Route the cable indoors through a wall hole (use the Cable Routing Kit for drilling/mounting; max bend radius to avoid kinks).
- Connect the other end to the WAN Ethernet port on the Gen 3 Router.
- Power on the router—the dish should align automatically via the Starlink App (under Network > Status).
- For extensions: Plug a standard Cat6 Ethernet cable into the router’s LAN port and connect to the dish cable if needed, but avoid exceeding 150 ft total to prevent signal loss. Setup takes 5-10 minutes; measure dish-to-router distance beforehand.
Performance and User Feedback
The cable supports full Starlink speeds (100-300 Mbps down, 10-20 Mbps up, <40 ms latency) with minimal interference, even in long runs up to 150 ft. Recent X posts and Reddit threads highlight its reliability in mobile installs (e.g., RVs), with users noting no voltage drop or lag during HD streaming. However, some report connector fragility if mishandled—official replacements are preferred over cheap AliExpress generics to avoid oxidation. Compared to Gen 2’s proprietary cable, V3 is easier to swap and extend, reducing downtime.


